That maddening drip… drip… drip from your faucet isn’t just annoying; it’s a constant reminder of wasted water and a pending repair bill. Whether your faucet handle is stiff, loose, or the tap just won’t shut off completely, the problem is almost always a worn-out internal component: the faucet cartridge.
Before you call a plumber and prepare for a hefty service fee, here’s the good news: replacing a faucet cartridge is one of the most straightforward and rewarding DIY plumbing tasks you can tackle. For the cost of a new cartridge (often under 20)andabout30−45minutesofyourtime,youcanpermanentlyfixthatleakandsaveover20) and about 30-45 minutes of your time, you can permanently fix that leak and save over 150 in professional labor costs.
This guide will walk you through every single step, from identifying the right part to the final leak-free test. We’ll provide expert tips learned from over 20 years in faucet manufacturing to ensure you get it right the first time.
CRITICAL SAFETY FIRST: Before you touch a single tool, you MUST shut off the water supply to the faucet. Locate the two shut-off valves (usually hot and cold) under the sink and turn them clockwise until they are fully closed. Turn the faucet on to drain any remaining water. No water coming out? You’re ready to begin.
Last Updated: April 2026 | Estimated Reading Time: 17 minutes
This Guide Will Show You How To:
- Pinpoint the Problem: Quickly determine if a faulty cartridge is the cause of your leak.
- Identify & Buy the Right Part: Learn the difference between cartridge types and avoid buying the wrong one.
- Replace the Cartridge Like a Pro: Follow our step-by-step visual guide for a flawless installation.
- Handle Common Problems: We’ll show you how to deal with stuck screws and corroded parts.
- Understand the Tech: Learn what makes a quality cartridge from a manufacturer’s perspective.
Part 1: The Preparation Phase (Don’t Skip This!)
Proper preparation is 90% of the job. Getting your tools and the correct replacement part ready beforehand turns a potentially frustrating task into a smooth, quick fix.
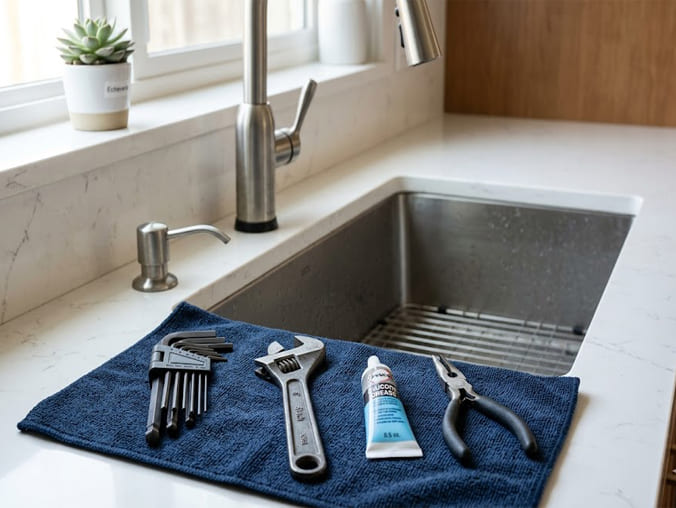
Your Essential Toolkit
You likely already have most of these tools. We’ve created a simple checklist for you.
| Tool | Purpose | Pro Tip / Alternative |
|---|---|---|
| Allen Key Set (Hex Keys) | To remove the handle’s set screw. | Most faucet handles use a 2.5mm or 3mm key. Check the screw head first. |
| Adjustable Wrench | To loosen the cartridge’s retaining nut. | For chrome or finished faucets, wrap the wrench jaws with a cloth or painter’s tape to prevent scratches. |
| Groove-Joint Pliers | For extra grip on stubborn nuts (use with caution). | Always use a protective cloth. This is your backup if the wrench slips. |
| Screwdriver (Phillips & Flathead) | To pry off decorative caps or remove handle screws. | A small pocket knife can also work for prying caps, but be gentle. |
| Silicone Grease (Plumber’s Grease) | To lubricate the new cartridge’s O-rings for a perfect seal. | Crucial: Do NOT use petroleum jelly (Vaseline), as it can damage rubber seals over time. |
| Old Rag or Towel | To clean the valve body and catch any drips. | Place one in the sink basin to prevent small parts from falling down the drain. |
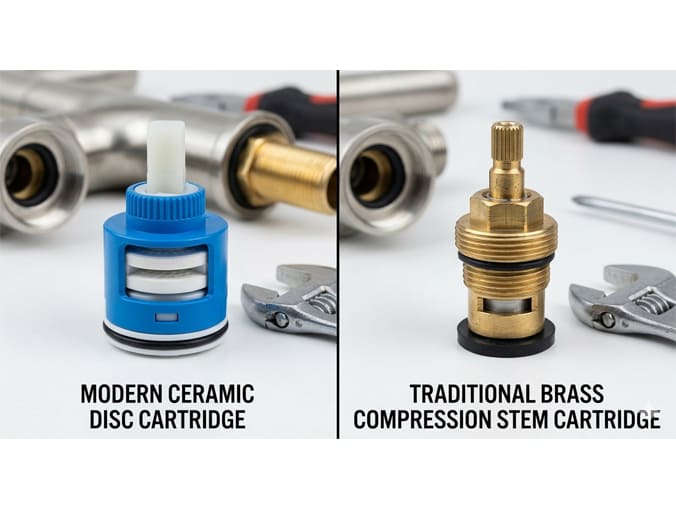
The Most Critical Step: Identifying Your Faucet Cartridge
This is where most DIY attempts go wrong. Faucet cartridges are not one-size-fits-all. Buying the correct one is essential.
Step 1: Determine Your Cartridge Type
Most modern single-handle faucets use a Ceramic Disc Cartridge. Older two-handle faucets might use Compression Cartridges (also called stems). Here’s how to tell them apart:
| Cartridge Type | How It Works & Feels | Common In |
|---|---|---|
| Ceramic Disc Cartridge | A simple 90° or 180° turn of the handle goes from off to full on. The handle action is smooth and precise. | Most modern faucets (since the 1990s). Single-handle and quarter-turn two-handle models. |
| Compression/Stem Cartridge | You have to turn the handle multiple full rotations to turn the water on or off. It feels like you’re tightening a screw. | Older, traditional two-handle faucets. Less common in new installations. |
Step 2: Find the Model Information
- Look for a Brand Name: Check the faucet body for a brand like Moen, Delta, Kohler, or American Standard. This is the best starting point.
- Take Photos: Take clear pictures of the faucet from multiple angles and, once you remove it, of the old cartridge itself.
- Measure It: Use a ruler to measure the cartridge’s height and diameter. Note the shape of the bottom and the stem.
Purchasing Pro-Tip: The most foolproof method is to take your old cartridge (or the photos and measurements) to a local hardware or plumbing supply store. Alternatively, searching online with the brand name and “faucet cartridge replacement” will often lead you to the right part.
Part 2: The Step-by-Step Replacement Guide
With the water off and your new cartridge in hand, you’re ready for the main event. Follow these steps precisely.
Step 1: Remove the Faucet Handle
Most modern faucet handles are held in place by a small, hidden set screw.
- Look for a small hole, often under the lever or at its base. It might be covered by a small decorative cap (red/blue for hot/cold), which you can gently pry off with a small flathead screwdriver.
- Insert the correct size Allen key into the hole and turn it counter-clockwise to loosen the screw. You don’t need to remove the screw completely.
- Once loose, lift the handle straight up and off the faucet body.
Step 2: Expose the Cartridge
With the handle gone, you’ll see the top of the cartridge, likely covered by a decorative dome or cap.
- This cap usually unscrews by hand (counter-clockwise).
- If it’s tight, wrap a cloth around it for better grip.
Step 3: Remove the Retaining Nut
Now you’ll see a large brass or metal nut holding the cartridge in place. This is the retaining nut.
- Use your adjustable wrench to grip the nut firmly.
- Turn it counter-clockwise to loosen and remove it.
Troubleshooting Tip: What if the nut is stuck? Corrosion can make this nut very difficult to turn. Do not force it! Instead, spray a small amount of penetrating oil (like WD-40) around the threads. Let it sit for 15-20 minutes, then try again. Tapping it gently with the handle of your wrench can also help break the corrosion seal.
Step 4: Remove the Old Cartridge
The cartridge should now be free.
- Grip the plastic or metal stem of the cartridge and pull it straight up.
- It might be snug due to the rubber O-rings. A gentle wiggle side-to-side while pulling can help dislodge it.
Step 5: Clean the Faucet Body
This is a crucial step for a leak-proof seal.
- Look inside the empty faucet body where the cartridge was sitting.
- Use your rag to wipe away any mineral deposits, debris, or old sealant. A toothbrush can help with stubborn buildup. The inside should be smooth and clean.
Step 6: Install the New Cartridge
It’s time for the new part.
- Lightly coat the rubber O-rings on the new cartridge with a thin layer of silicone grease. This protects the seals and makes installation easier.
- Look for alignment tabs or notches on the bottom of the cartridge. These must match corresponding slots inside the faucet body. This ensures the hot and cold water flows correctly.
- Gently press the new cartridge down into the faucet body until it is fully and evenly seated. If it doesn’t sit flat, you have it misaligned.
Step 7: Reassemble the Faucet
You’re on the home stretch! Reassemble everything in the reverse order you took it apart.
- Screw on the Retaining Nut: Tighten it with your wrench until it is snug. Do not overtighten! A “hand-tight plus a quarter-turn with the wrench” is a good rule of thumb. Overtightening can crack the ceramic cartridge.
- Replace the Decorative Cap: Screw it back on by hand.
- Re-install the Handle: Place the handle back on the cartridge stem and tighten the set screw with your Allen key.
Part 3: The Final Checks & Testing
Now, let’s bring it back to life safely.
- Turn the Water On SLOWLY: Go back to the shut-off valves under the sink. Turn them counter-clockwise very slowly. Opening them too fast can cause a “water hammer” shock to your pipes. Open them only a quarter of the way at first.
- Check for Leaks: With the faucet handle still in the “off” position, carefully inspect around the base of the handle and spout for any drips.
- Test Faucet Operation: If there are no leaks, slowly open the shut-off valves all the way. Turn the faucet handle on and test both hot and cold water flow. Check that the handle moves smoothly and shuts off completely.
- Final Leak Check: With the water now at full pressure, do one last visual inspection for any leaks.
Congratulations! You’ve just successfully replaced your faucet cartridge and saved yourself a significant amount of money.
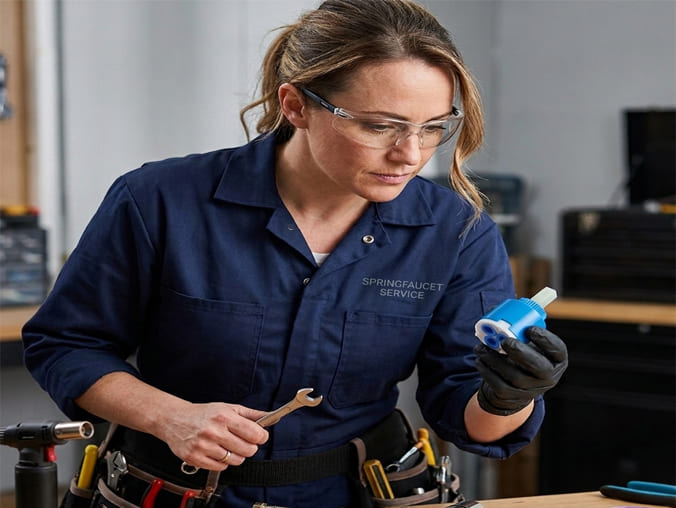
A Manufacturer’s Insight: What Defines a Quality Cartridge?
As an OEM/ODM faucet manufacturer with nearly 20 years of experience, SPRINGFAUCET understands that the cartridge is the heart of any faucet. While they may look similar, their internal quality can vary dramatically, affecting the faucet’s lifespan and feel.
For our B2B clients and discerning homeowners, here is what we prioritize:
| Feature | Low-Quality Cartridge | High-Quality (e.g., Sedal, Kerox, or equivalent) | Why It Matters for You |
|---|---|---|---|
| Disc Material | Softer, less pure ceramic or even plastic. | High-grade, diamond-polished aluminum oxide ceramic. | Ultra-hard discs resist wear from debris in the water, ensuring a drip-free seal for years. |
| Lifecycle Rating | Untested or rated for <100,000 cycles. | Independently tested and certified for 500,000+ cycles. | This guarantees over a decade of smooth, reliable, everyday use for a typical family. |
| Lubrication | Basic, non-food-grade grease. | NSF-approved, food-grade silicone lubricant. | Ensures smooth handle operation and is safe for your drinking water. |
| Body Material | Flimsy plastic housing. | High-strength, reinforced polymer or solid brass. | Provides a robust foundation that won’t crack under pressure or during installation. |
When sourcing faucets for a project or choosing one for your home, asking about the cartridge’s brand and lifecycle rating is a mark of a knowledgeable buyer. It’s why products like our popular Tall Basin Faucet, a bestseller in the Middle East market, are built with premium cartridges designed for long-term performance in demanding environments.
Frequently Asked Questions (FAQ)
Q1: What happens if I install the cartridge misaligned? If the alignment tabs aren’t in the correct slots, your hot and cold water will be reversed. In some cases, the faucet may not shut off properly or the handle will feel very stiff. Simply take it apart and reseat the cartridge correctly.
Q2: Is a brass cartridge better than a plastic one? Not necessarily. While a solid brass body is a sign of premium quality, the most critical components are the internal ceramic discs. A high-quality polymer-bodied cartridge with top-tier ceramic discs will outperform a poorly made all-brass one.
Q3: My faucet is still leaking from the base after replacing the cartridge. What’s wrong? This usually indicates that the O-rings on the faucet body (not the cartridge) are worn out. These are separate seals located at the base where the spout swivels. This is a more involved repair, and at this point, you might consider if replacing the entire faucet is more cost-effective.
Q4: When should I give up on DIY and call a plumber? If the faucet body itself is cracked, if critical parts are so corroded they break during removal, or if the leak persists after you’ve correctly installed a new cartridge and checked the seals, it’s time for a professional. For very old faucets, the cost of multiple parts can quickly approach the cost of a new, more efficient faucet.
Conclusion: Empowered, Fixed, and Money Saved
By following this guide, you’ve done more than just fix a leak. You’ve taken control, learned a valuable skill, and kept your hard-earned money in your pocket. That feeling of turning the handle and seeing a crisp, clean shutoff with no drips is a testament to your capability. You didn’t need to wait for a plumber; you solved the problem yourself.
Today, you didn’t just save money—you invested in your home and your own skills.
Recommended Links
Internal Links:
- The Ultimate Guide to Faucet Finishes: PVD vs. Electroplating
- Choosing the Right Faucet Material: Stainless Steel vs. Brass
- Explore Our Full Collection of Bathroom Basin Faucets
External Links (Authoritative Sources):
- Wikipedia: Ceramic Disc Valve – Technical background on the technology inside your faucet.
- Home Depot: Identify Your Faucet Cartridge Type – A helpful visual guide from a major retailer.
- NSF International: Certified Plumbing Products – An authoritative source for understanding product safety certifications.