Is your faucet’s water flow weak, sputtering, or spraying off to the side? Before you call a plumber or consider replacing the entire fixture, the solution is likely simple, free, and hiding at the very tip of your faucet’s spout. The culprit is almost always a clogged faucet aerator.
As faucet manufacturers, we design and install these small but crucial components in every faucet we produce. We know them inside and out. An aerator’s job is to shape the water stream, prevent splashing, and save water, but over time, it traps mineral deposits and sediment from your water supply. Cleaning it is the single most effective piece of maintenance you can perform.
This definitive guide will walk you through every step of the process with an expert’s precision. We’ll show you how to identify your aerator type, safely remove it (even if it’s stuck), clean it perfectly, and get your faucet working like new in under 15 minutes.
Last Updated: Dec 2025 | Estimated Reading Time: 14 minutes
First, Why Does Your Faucet Have an Aerator?
Before we start unscrewing, it’s helpful to understand what this little part actually does. It’s a small piece of engineering that dramatically improves your faucet’s performance.
| Feature | What It Is | What It Means For You |
|---|---|---|
| Water Conservation | Infuses the water stream with tiny air bubbles. | Reduces water volume without sacrificing pressure, lowering your water bill. A standard aerator can cut water use by 30% or more. |
| Splash Prevention | Creates a single, soft, non-splashing stream. | Stops water from splashing all over you and your countertops every time you turn on the tap. |
| Water Shaping | Forces the water through a fine screen or series of channels. | Creates a perfectly straight, aesthetically pleasing column of water, rather than a messy, gushing flow. |
| Filtration | A small mesh screen acts as a final filter. | Catches sediment, debris, and mineral particles that could otherwise clog the internal workings of your faucet or end up in your water. |
Step 1: Preparation is Key (Don’t Skip This!)

Taking 60 seconds to prepare will prevent headaches and save you from losing small parts down the drain.
- Close the Sink Drain: This is the most important step. Use the stopper or place a small cloth over the drain opening. Aerators have tiny parts (washers, screens) that are very easy to drop and lose forever.
- Turn Off the Water Supply (Optional but Recommended): While not strictly necessary for just removing the aerator, it’s a professional best practice. Turn the hot and cold water shut-off valves under your sink clockwise until they stop. This prevents accidental splashes if someone bumps the handle.
- Gather Your Tools:
- Adjustable pliers or a small wrench
- A soft cloth, rag, or rubber band to protect the faucet’s finish
- An old toothbrush and a safety pin or needle
- A small bowl for soaking
- White vinegar
Step 2: Identify Your Aerator Type
Faucets use different types of aerators. Identifying yours will determine which tool and technique to use. Look at the very tip of your faucet spout.

| Aerator Type | How to Identify It | Common Sizes | Required Tool |
|---|---|---|---|
| Standard Aerator | A visible metal ring (the housing) with flat sides or knurled texture at the end of the spout. The most common type. | M24x1 (Male threads) or M22x1 (Female threads). | Pliers or Wrench |
| Hidden / Cache Aerator | The end of the spout is smooth and flush. The aerator is recessed inside and has small slots or a coin slot. | Standard, Junior, Tiny, or Tom Thumb sizes. | Aerator Key (often included with the faucet) or a coin. |
| Specialty Aerator | Has a unique shape, often a very small rectangular or slot-like opening. | Manufacturer-specific. | A special tool from the manufacturer is usually required. |
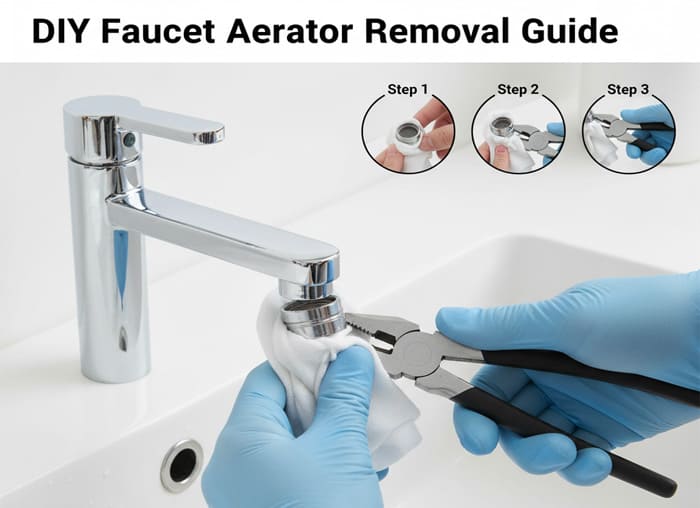
Step 3: Step-by-Step Removal Instructions
Follow the method that matches your aerator type. Remember the golden rule of plumbing: Righty-Tighty, Lefty-Loosey. You will always be turning counter-clockwise to remove.
Method A: Removing a Standard Aerator
This is the most common type found on kitchen and bathroom faucets.
- Protect the Finish: Wrap your soft cloth or a thick rubber band around the metal aerator housing. This is a critical step to prevent the teeth of your pliers from scratching and ruining the chrome, black, or brushed finish.
- Get a Firm Grip: Grip the cloth-wrapped housing firmly with your adjustable pliers or wrench. Don’t squeeze so hard that you deform the housing.
- Turn Counter-Clockwise: Apply slow, steady pressure to turn the aerator counter-clockwise. You may feel an initial “pop” as the threads break free.
- Unscrew by Hand: Once it’s loose, you can finish unscrewing it by hand and remove it from the spout.
Manufacturer’s Insight: Why does the finish matter so much? As an OEM/ODM factory, SpringFaucet produces faucets with a wide array of high-end finishes, from durable PVD brushed gold to flawless matte black. A single deep scratch from a pair of pliers can ruin the aesthetic and compromise the finish’s integrity. Always protect the surface. Our reputation is built on this attention to detail, which is why we supply pristine, quality-controlled products to buyers worldwide.
Method B: Removing a Hidden / Cache Aerator
These are used to create a seamless, minimalist faucet design.
- Find the Right Tool: Look for the plastic or metal aerator key that came with your faucet. It will have teeth that match the slots on the aerator. If you can’t find it, a large, thick coin (like a quarter) can often work.
- Insert the Key: Press the key firmly into the slots of the aerator.
- Turn Counter-Clockwise: Turn the key counter-clockwise to unscrew the aerator insert directly from the faucet body. It will likely be made of plastic and may take a bit of force to get started.
Step 4: Expert Troubleshooting for a Stuck Aerator
What if it won’t budge? This is usually due to years of mineral deposit buildup (limescale) essentially “gluing” the threads together. Don’t panic, and don’t apply excessive force.
Solution 1: The Vinegar Soak Method
This is the most effective solution for mineral buildup.
- Fill a Small Bag: Get a small plastic bag (a sandwich bag works well) and fill it with enough white vinegar to fully submerge the end of the faucet spout.
- Attach the Bag: Secure the bag around the spout with a rubber band, ensuring the aerator is completely immersed in the vinegar.
- Let it Soak: Leave it for at least 1-2 hours (or overnight for severe buildup). The acetic acid in the vinegar will dissolve the calcium and lime deposits.
- Try Again: Remove the bag and attempt to unscrew the aerator again using the appropriate method. It should now come loose much more easily.
Solution 2: Apply Gentle Heat
Heat can cause the metal housing to expand slightly, which can be just enough to break the bond of the threads.
- Use a Hairdryer: Set a hairdryer to its highest heat setting.
- Heat the Aerator: Direct the hot air onto the aerator housing for 1-2 minutes.
- Attempt Removal: Immediately (while it’s still hot), use your cloth-wrapped pliers to try and unscrew it.
Step 5: The Cleaning and Reassembly Process
Once the aerator is removed, it’s time to restore it.
- Disassemble: Carefully take the aerator apart over your closed sink drain or a bowl. Note the order of the parts. You will typically have the outer housing, one or more inner screens (the insert), and a rubber washer. The rubber washer is crucial for a watertight seal.
- Initial Rinse: Rinse all the parts under a stream of water to remove any loose debris.
- Vinegar Bath: Place all the components in a small bowl and cover them with white vinegar. Let them soak for 30 minutes. You’ll likely see bubbles as the vinegar dissolves the mineral deposits.
- Scrub and Detail: Use an old toothbrush to gently scrub the screens and housing. For stubborn particles stuck in the mesh, carefully poke them out with a safety pin or needle.
- Final Rinse: Rinse all parts thoroughly with clean water.
- Reassemble: Put the aerator back together in the exact reverse order you took it apart. The rubber washer should always be at the top (the part that will press against the faucet spout).
- Reinstall: Screw the aerator back into the faucet by hand, turning it clockwise. Hand-tight is usually sufficient, but you can give it a final 1/8th turn with your protected pliers to ensure a snug, leak-free fit.
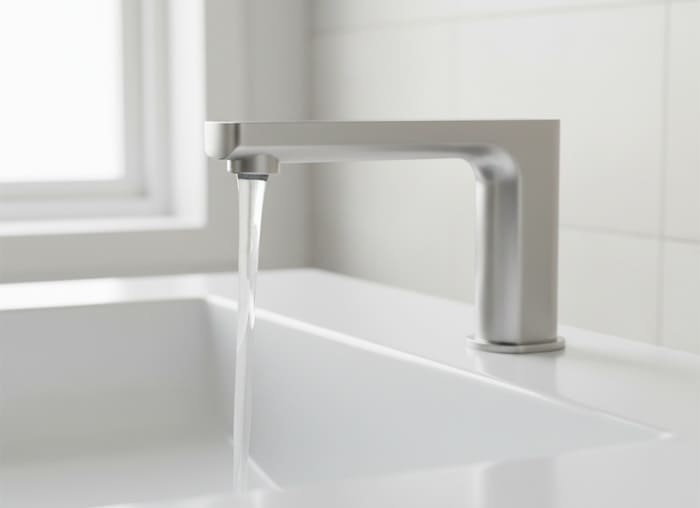
- Test: Turn your water supply back on and test the faucet. You should be rewarded with a full, clear, and perfectly shaped stream of water.
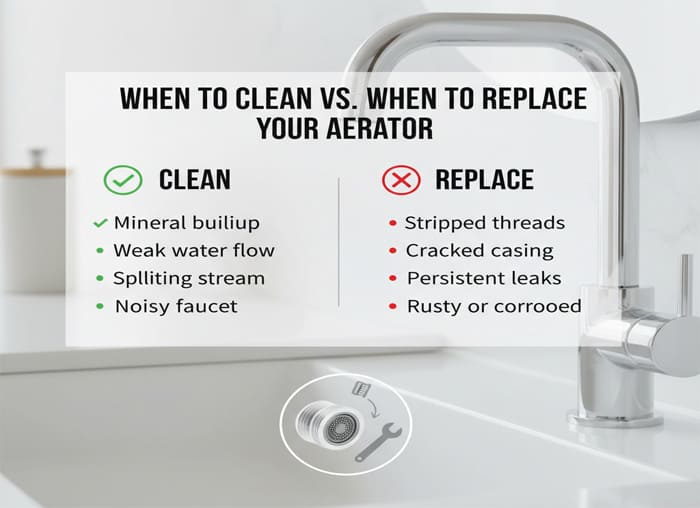
When to Clean vs. When to Replace Your Aerator
Sometimes, a cleaning isn’t enough. Here’s how to decide.
| Scenario | Recommendation | Expert Reasoning |
|---|---|---|
| Clogged with Sediment | Clean | This is the aerator’s primary job. A simple cleaning will restore it to new. |
| Cracked Housing | Replace | A cracked housing can lead to leaks and will not tighten properly. |
| Torn or Damaged Screen | Replace | A damaged screen can’t shape the water properly and will result in a messy spray. |
| Missing Rubber Washer | Replace | Without the washer, the aerator will leak around the threads. It’s often easier to buy a new aerator than to find the exact size washer. |
If you need to replace it, simply take your old aerator to a hardware store. They are standard sizes (M24x1 Male or M22x1 Female) and are inexpensive to purchase.
Frequently Asked Questions (FAQs) {#faq}
Q1: How often should I clean my faucet aerator? In areas with average water, cleaning it once a year is a good practice. If you live in an area with very hard water or have a well, you may need to clean it every 3-6 months to maintain optimal flow.
Q2: Will removing my aerator increase water pressure? Temporarily, yes. But it will also result in a messy, splashing, high-volume stream that uses significantly more water. The goal is to restore the designed flow rate, not to create a fire hose. A clean aerator provides the best performance.
Q3: Can cleaning my aerator damage my faucet? No, as long as you follow the steps and use a cloth to protect the finish. The aerator is a separate, replaceable part designed for regular maintenance. The process is completely safe for the faucet itself.
Conclusion: A Simple Fix for a Major Annoyance
The faucet aerator is a perfect example of a small part that makes a huge difference. By taking a few minutes to clean it, you can solve one of the most common plumbing frustrations, improve your faucet’s performance, and save water—all without spending a dime.
As a factory that specializes in providing robust, high-quality faucets for diverse global markets, we at SpringFaucet know that reliability is paramount. Our products, like the versatile Modern Flexible Hose Kitchen Faucet, are engineered for easy maintenance because we understand the needs of both the end-user and our B2B partners who demand dependable, long-lasting products. This commitment to thoughtful design is what makes a great faucet.
Recommended Links
Internal Links:
- Our Products: Explore Our Full Range of OEM/ODM Faucet Solutions
- About Us: Learn About Our Manufacturing Capabilities and Quality Control
- Blog: Kitchen Faucet 101: A Manufacturer’s Ultimate Guide
External Links (Authoritative Sources):
- Wikipedia: Faucet Aerator – A technical overview of what aerators are and how they work.
- EPA WaterSense Program – Learn more about the importance of water-saving aerators and how they contribute to conservation.
- The Spruce: How to Clean or Replace a Faucet Aerator – A reputable home improvement site with additional visual guides.