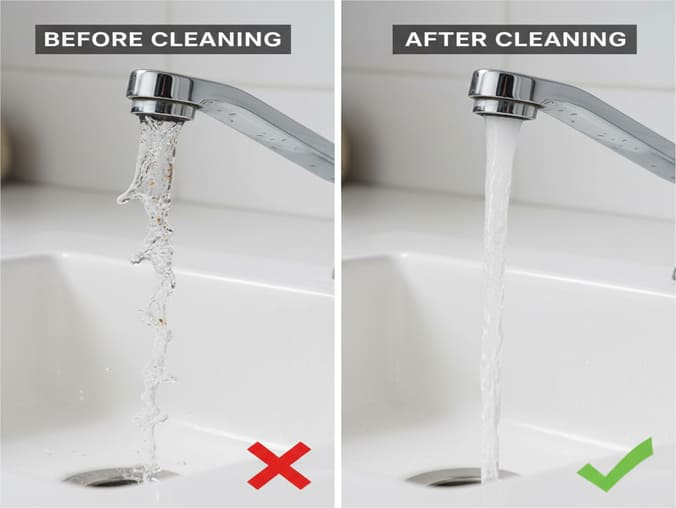
Is your powerful faucet stream now a sad, sputtering trickle? Before you call a plumber or shop for a replacement, the culprit is almost certainly a clogged faucet head. Mineral deposits from hard water—limescale and calcium—are choking the flow. The good news is that this is one of the easiest and most satisfying DIY fixes you can do.
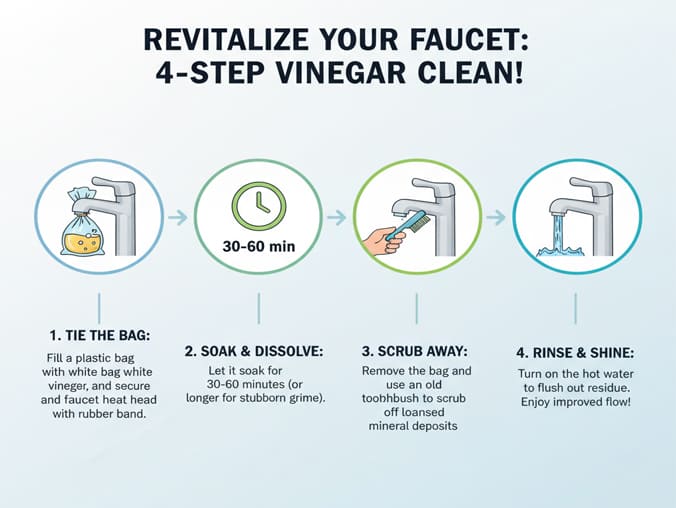
To quickly clean your faucet head, fill a plastic bag with white vinegar, secure it over the faucet head with a rubber band so the nozzle is submerged, and let it soak for 30-60 minutes. The acetic acid in the vinegar will naturally dissolve the mineral buildup, restoring full water flow without any special tools.
This guide will walk you through that simple “bag trick,” as well as more advanced deep-cleaning methods, and provide expert advice on preventing clogs from coming back.
Last Updated: May 2026 | Estimated Reading Time: 14 minutes
In This Ultimate Guide, You Will Learn:
- The 5-minute “bag trick” to clean any faucet head without removing it.
- How to identify your faucet type and choose the right cleaning method.
- A step-by-step guide for deep cleaning by disassembling the aerator.
- Why you should NEVER use bleach and when to use commercial cleaners like CLR.
- Expert tips from a 20-year faucet manufacturer to prevent clogs for good.
- Special considerations for maintaining faucets in commercial properties.
What Type of Faucet Head Do You Have?
The first step is to identify your faucet type, as this determines the best cleaning approach. While the vinegar bag trick works on almost anything, understanding the components helps with deeper cleans.
- Standard Aerator: This is the most common type on bathroom and basic kitchen faucets. It’s a small, threaded cap at the very tip of the faucet that can be unscrewed.
- Pull-Down/Pull-Out Spray Head: Found on modern kitchen faucets. The entire head is a wand that pulls out. These have more complex nozzles and an internal screen that can get clogged.
- Shower Head: Larger with many individual nozzles. Due to their fixed position and size, they are perfect candidates for the “no-remove” soaking method.
| Faucet Type | Recommended Cleaning Method | Difficulty | Common Clog Location |
|---|---|---|---|
| Kitchen/Bath Aerator | Disassembly and deep clean | ★☆☆☆☆ | The fine mesh screen inside the aerator housing. |
| Pull-Down/Out Sprayer | “Bag Trick” soak, then nozzle scrub | ★★☆☆☆ | The tiny spray nozzles and the filter screen at the hose connection. |
| Fixed Shower Head | “Bag Trick” soak (large bag) | ★☆☆☆☆ | The individual silicone or plastic spray nozzles. |
| Handheld Shower Wand | Disassembly or “Bag Trick” soak | ★★☆☆☆ | The spray face nozzles and the filter screen where the hose connects. |
A Note from the Factory Floor: Modern faucets, especially from quality manufacturers like SPRINGFAUCET, often feature soft silicone or rubber nozzles. These are designed for easy cleaning—you can often dislodge mineral buildup simply by rubbing your thumb over the nozzles while the water is running. This is a design feature we incorporate specifically to combat hard water issues.
The “Bag Trick”: How to Clean a Faucet Head Without Removing It
This is the go-to method for 90% of clogging issues. It’s simple, effective, and requires zero tools. It’s perfect for pull-down sprayers and fixed shower heads.
Step 1: Gather Your Supplies
You only need three things:
- White Vinegar: The star of the show. Its acetic acid is perfect for dissolving calcium and limescale.
- A Sturdy Plastic Bag: A zip-top sandwich bag for faucets, or a larger freezer or small trash bag for shower heads.
- Rubber Bands or Zip Ties: To secure the bag tightly to the faucet.
Step 2: Fill and Secure the Bag
Pour enough white vinegar into the bag so that the faucet head’s nozzles will be completely submerged when you attach it. Carefully lift the bag up and over the faucet head. Secure it tightly with one or two rubber bands around the neck of the faucet.
Pro Tip: For extra cleaning power, use warm vinegar (heat it in the microwave for 30 seconds). The heat will accelerate the chemical reaction, cutting down on soak time.
Step 3: Let It Soak
The soaking time depends on the severity of the buildup.
- Light Buildup / Regular Maintenance: 30-60 minutes is plenty.
- Heavy Buildup / Very Hard Water: Let it soak for 2-4 hours, or even overnight for severely calcified heads.
A Word of Caution on Finishes: While standard chrome is very durable, if you have a special finish like Matte Black, Brushed Gold, or Oil-Rubbed Bronze, limit the soak time to 30 minutes to be safe. High-quality PVD (Physical Vapor Deposition) finishes are very resilient, but prolonged exposure to acid is never ideal.
Step 4: Remove and Flush
Carefully remove the bag and pour the vinegar down the drain. Turn the faucet on—hot water works best—and let it run for a full minute. You should see a noticeably stronger, more uniform stream. Use an old toothbrush or a soft cloth to scrub away any remaining loose deposits from the nozzles.
Deep Cleaning: How to Take Apart and Clean an Aerator
If the soak didn’t fully solve the problem, or you have a standard faucet, it’s time for a deep clean. This involves unscrewing the aerator to clean its internal components.
Tools You’ll Need:
- Adjustable Pliers or Wrench
- A thick rag or painter’s tape
- An old toothbrush
- A paperclip or toothpick
| Step | Action | Why It’s Important |
|---|---|---|
| 1. Protect the Finish | Wrap the jaws of your pliers with painter’s tape or wrap a thick rag around the aerator housing. | This is the #1 rule. The pressure from metal pliers will permanently scratch and damage the chrome or PVD finish of your faucet. This simple step preserves its beauty. |
| 2. Unscrew the Aerator | Grip the aerator housing with your protected pliers and turn it counter-clockwise (“lefty-loosey”). It should come off with moderate pressure. | The aerator holds all the key components. If it’s stuck, you may need to apply a penetrating oil, but usually, firm pressure is enough. |
| 3. Disassemble & Inspect | Carefully lay out the components on a towel in the order you remove them. You will find an O-ring (rubber gasket), a metal or plastic housing, and one or more fine mesh screens. | The mesh screens are where sediment and debris get trapped. The O-ring provides the seal; be careful not to damage it. |
| 4. Clean the Components | Soak the mesh screens and housing in vinegar for 15-20 minutes. Use an old toothbrush to scrub away all debris. Use a toothpick to poke out any stubborn particles from the screen holes. Rinse thoroughly. | This is the “deep clean” that the bag trick can’t achieve. It removes physical debris, not just mineral buildup. |
| 5. Reassemble & Test | Reassemble the parts in reverse order. Hand-tighten the aerator first, then give it a final quarter-turn with the protected pliers. Turn on the water to check for leaks and enjoy your restored pressure. | Overtightening can damage the O-ring and threads. Snug is good enough. |
A Note for Professionals: Faucet Maintenance in Commercial Settings
For hotel managers, property developers, and maintenance teams, faucet performance is about guest satisfaction and asset protection.
- Proactive Maintenance is Key: Don’t wait for a low-pressure complaint. Schedule a quarterly “vinegar soak” for all faucets and shower heads, especially in hard water areas.
- Standardize Your Fixtures: Using a single, high-quality faucet model across a property simplifies maintenance. For example, using a durable fixture like the SPRINGFAUCET Bathtub Faucet, popular in the demanding UK hospitality market, means your team only needs to know one system and stock one set of spare parts (aerators, cartridges). This drastically improves efficiency.
- Build a “Cleaning Kit”: Equip your maintenance carts with a dedicated faucet cleaning kit: a gallon of vinegar, assorted-size bags, rubber bands, a set of soft-jawed pliers, and a box of spare aerators for your standard faucet model. Swapping in a new aerator is faster than cleaning a badly clogged one on the spot.
As an OEM/ODM partner, SPRINGFAUCET works with commercial clients to develop faucets that are not only stylish and compliant with regional standards (like WRAS in the UK) but also designed for simple, efficient long-term maintenance.
Troubleshooting & FAQ: Why Is My Faucet Still Clogged?
(This section is ideal for FAQPage Schema)
Can I use CLR or other chemical cleaners instead of vinegar? Yes, commercial cleaners like CLR (Calcium, Lime, Rust remover) are more powerful and work faster than vinegar. However, they are harsh chemicals. Use them with caution: limit contact time to a few minutes, wear gloves, and rinse the faucet head extremely thoroughly afterward. They can degrade rubber gaskets and damage delicate finishes if left on for too long. Vinegar is the safer first choice.
Is it safe to use bleach to clean a faucet head? ABSOLUTELY NOT. Never use bleach. Bleach is a powerful oxidizer that will not dissolve minerals. Instead, it will permanently damage and discolor metal finishes (especially chrome and stainless steel) and will cause rubber and silicone seals (like O-rings and nozzles) to become brittle and fail, leading to leaks.
My faucet head is clean, but the pressure is still low. What now? If cleaning the head didn’t work, the clog is further up the line.
- Check the Supply Lines: The clog could be in the flexible hoses under the sink.
- Check the Shut-off Valves: The valves themselves could be partially closed or clogged.
- Cartridge Issue: The internal valve cartridge of the faucet could be failing or clogged with debris from the main water line. This is a more involved repair.
How do I stop my faucet head from dripping after cleaning and reassembly? A drip almost always means a bad seal. Unscrew the aerator again and check the rubber O-ring. Is it seated properly? Is it cracked, brittle, or flattened? If it looks damaged, it’s a sub-$1 part you can find at any hardware store that will solve your problem.
Conclusion: Prevention is the Best Cure
You’ve successfully restored your faucet’s powerful flow. To keep it that way, prevention is key.

Prevention Tips:
- Wipe Down Daily: After use, wipe the faucet head with a dry cloth. This prevents water from evaporating and leaving minerals behind.
- Monthly Quick Scrub: Once a month, use your finger or a soft cloth to rub the nozzles while the water is running. This dislodges any new buildup before it hardens.
- Invest in a Water Softener: If you live in an area with very hard water, the only permanent solution is a whole-house water softener. It will protect not just your faucets, but all your water-using appliances.
Cleaning a faucet head is a simple task that has a huge impact on your daily routine. By understanding the components and using the right methods, you can keep your fixtures looking and working like new for years.
Was this guide helpful? Share it with someone you know who’s struggling with low water pressure!
Recommended Internal & External Links:
- Internal: Low Maintenance Commercial Faucets Buyers Guide in 2026 – If cleaning doesn’t work, it might be time for an upgrade.
- Internal: Understanding Faucet Finishes: PVD vs. Chrome – Learn more about the durability of your faucet’s finish.
- External Product: SPRINGFAUCET Bathtub Faucet for UK Market – An example of a high-quality fixture designed for durability and ease of maintenance.
- External Authority: USGS Water Hardness Information – An authoritative source from the U.S. Geological Survey to understand water hardness in your area.
- External DIY Resource: This Old House: How to Fix Low Water Pressure – A trusted source for further plumbing troubleshooting steps.